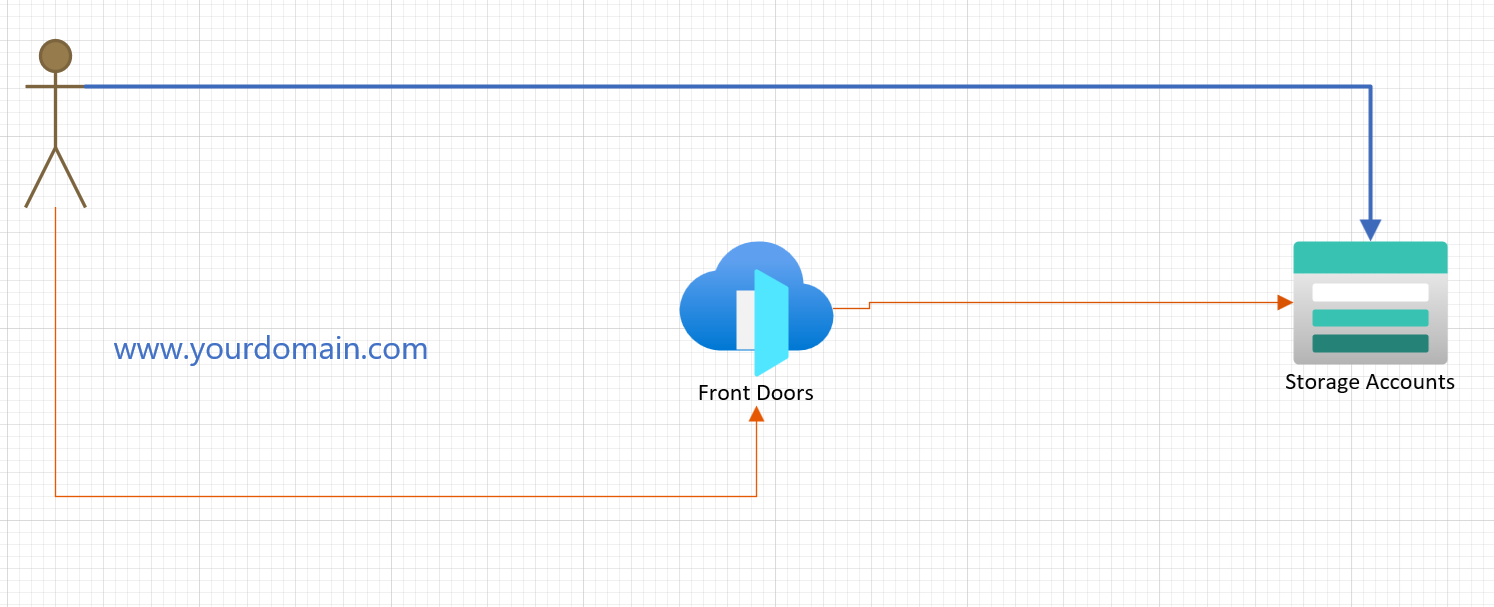
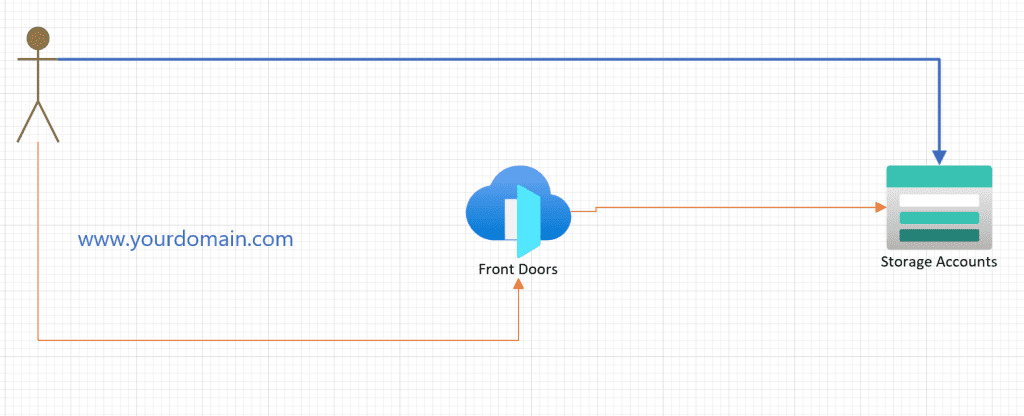
In this post, we will use Terraform to deploy a static website on Azure, leveraging Azure Storage and Azure Front Door. To keep things simple, I will be deploying everything from my local machine. However, in a real-world scenario, I would store the Terraform state in an Azure Storage Account, create a service principal (SPN), and set up federation with my GitHub repository where my code is hosted. But for now, the goal is to demonstrate how to set up Azure Front Door with an Azure Storage Account that has static website hosting enabled.
Step 1: Create the Storage Account with Terraform
The first step is to create a resource group and an Azure Storage Account. For redundancy and performance, I will use Read-Access Geo-Redundant Storage (RAGRS). This setup ensures that if the primary region becomes unavailable, the data can still be accessed from the secondary region, improving availability.
To learn more about RAGRS, check out Microsoft’s documentation.
Building the First Part of the Infrastructure
resource "azurerm_resource_group" "rg_demo_static_website" {
  name     = "rg-demo-static-website-002"
  location = "francecentral" # Update with the actual location of your resource group
  tags = {
    environment = "Dev"
  }
}


# This resource creates an Azure Storage Account with the specified configurations.
# - `name`: The name of the storage account.
# - `resource_group_name`: The name of the resource group where the storage account will be created.
# - `location`: The location/region where the storage account will be created.
# - `account_tier`: The performance tier of the storage account (Standard or Premium).
# - `account_replication_type`: The replication strategy for the storage account (e.g., LRS, GRS, RAGRS, ZRS).
# - `account_kind`: The kind of storage account (e.g., Storage, StorageV2, BlobStorage).
# - `infrastructure_encryption_enabled`: Whether infrastructure encryption is enabled for the storage account.
# - `tags`: A map of tags to assign to the storage account.

# This resource configures a static website for the specified Azure Storage Account.
# - `storage_account_id`: The ID of the storage account to enable the static website on.
# - `index_document`: The name of the index document for the static website.
# - `error_404_document`: (Optional) The name of the custom 404 error document for the static website.

resource "azurerm_storage_account" "storage_staticwebtorageachraf002" {
  name                              = "staticwebtorageachraf002"
  resource_group_name               = azurerm_resource_group.rg_demo_static_website.name
  location                          = azurerm_resource_group.rg_demo_static_website.location
  account_tier                      = "Standard"
  account_replication_type          = "RAGRS"
  account_kind                      = "StorageV2"
  infrastructure_encryption_enabled = true
  tags = {
    environment = "Dev"
  }
}

resource "azurerm_storage_account_static_website" "static_website02" {
  storage_account_id = azurerm_storage_account.storage_staticwebtorageachraf002.id
  #error_404_document = "customnotfound.html"
  index_document = "index.html"
}
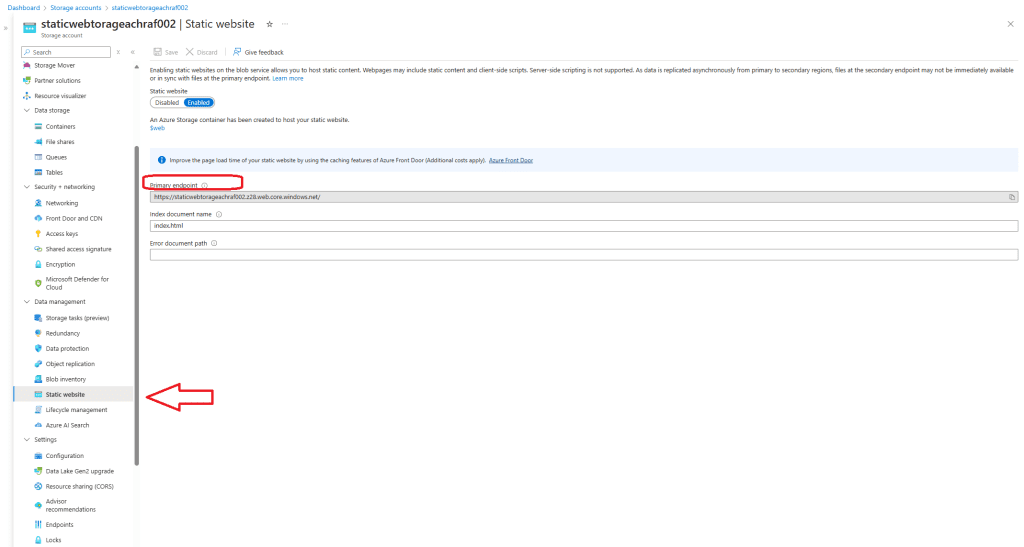
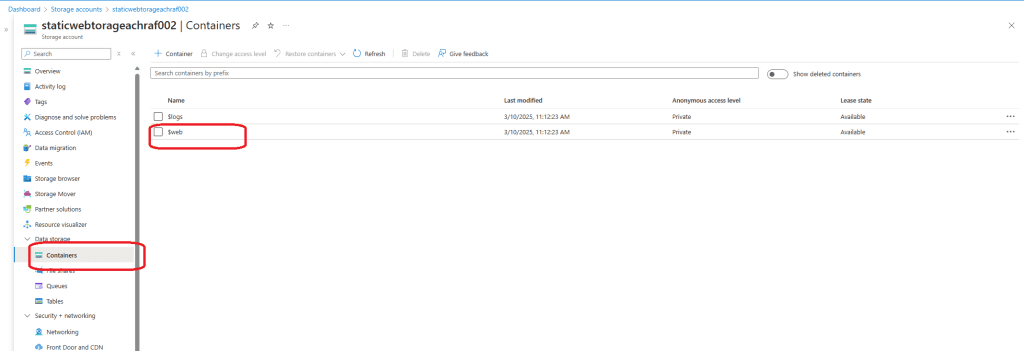
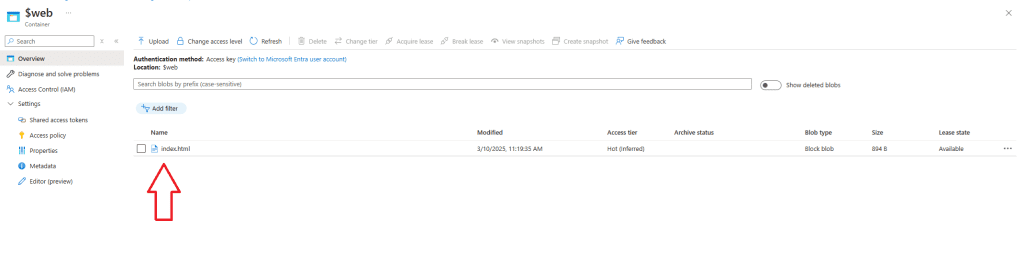
Once the Terraform deployment is complete, our storage account is created with static website hosting enabled. Azure automatically creates a new container called $web, where we will store our website files. For now, I will place a simple index.html file in this folder.
Step 2: Deploy Azure Front Door with Terraform
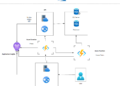
Now that we have our storage account ready, the next step is to deploy Azure Front Door Standard. But before jumping into the deployment, let’s briefly understand what Azure Front Door is and why it’s useful.
What is Azure Front Door?
Azure Front Door is a globally distributed service that enhances website performance, security, and availability. Here are some key benefits:
- Global Load Balancing
- Distributes traffic across multiple backends (App Services, VMs, AKS, etc.).
- Ensures high availability by routing traffic to the healthiest/closest backend.
- Performance Acceleration
- Uses smart routing to reduce latency and improve response times.
- Supports caching for static content (available in Azure Front Door Standard/Premium).
- Security Enhancements
- Includes a Web Application Firewall (WAF) to protect against DDoS, SQL injection, and XSS attacks.
- Provides TLS termination for secure HTTPS connections.
- Offers bot protection to filter malicious traffic.
- URL-Based Routing & Redirection
- Routes requests based on path, hostname, or query parameters.
- Supports HTTP to HTTPS redirection and domain changes.
- High Availability & Failover
- Automatically fails over to the nearest available backend.
- Uses health probes to monitor backend status in real time.
For more details, check out Microsoft’s documentation.
resource "azurerm_cdn_frontdoor_profile" "fqdn_profile" {
  name                     = "achrafbenalayastaticwebsite008"
  resource_group_name      = azurerm_resource_group.rg_demo_static_website.name
  response_timeout_seconds = 16
  sku_name                 = "Standard_AzureFrontDoor"
}

resource "azurerm_cdn_frontdoor_endpoint" "web_endpoint" {
  name                     = "web"
  cdn_frontdoor_profile_id = azurerm_cdn_frontdoor_profile.fqdn_profile.id
}

resource "azurerm_cdn_frontdoor_rule_set" "rule_set" {
  name                     = "caching"
  cdn_frontdoor_profile_id = azurerm_cdn_frontdoor_profile.fqdn_profile.id
}


resource "azurerm_cdn_frontdoor_origin_group" "origin_group_web" {
  name                     = "web"
  cdn_frontdoor_profile_id = azurerm_cdn_frontdoor_profile.fqdn_profile.id

  load_balancing {
    additional_latency_in_milliseconds = 0
    sample_size                        = 16
    successful_samples_required        = 3
  }
  health_probe {
    interval_in_seconds = 100
    path                = "/index.html"
    protocol            = "Http"
    request_type        = "HEAD"
  }
}

resource "azurerm_cdn_frontdoor_origin" "web_origin" {
  depends_on                     = [azurerm_storage_account.storage_staticwebtorageachraf002]
  name                           = "web"
  cdn_frontdoor_origin_group_id  = azurerm_cdn_frontdoor_origin_group.origin_group_web.id
  enabled                        = true
  certificate_name_check_enabled = false
  host_name                      = azurerm_storage_account.storage_staticwebtorageachraf002.primary_web_host
  origin_host_header             = azurerm_storage_account.storage_staticwebtorageachraf002.primary_web_host

  http_port  = 80
  https_port = 443
  priority   = 1
  weight     = 1000
}


resource "azurerm_cdn_frontdoor_rule" "cache_rule" {
  depends_on = [
    azurerm_cdn_frontdoor_origin_group.origin_group_web,
    azurerm_cdn_frontdoor_origin.web_origin
  ]
  name                      = "static"
  cdn_frontdoor_rule_set_id = azurerm_cdn_frontdoor_rule_set.rule_set.id
  order                     = 1
  behavior_on_match         = "Stop"


  conditions {
    url_file_extension_condition {
      operator     = "Equal"
      match_values = ["css", "js", "ico", "png", "jpeg", "jpg", ".map"]
    }
  }
  actions {
    route_configuration_override_action {
      compression_enabled = true
      cache_behavior      = "HonorOrigin"
    }
  }
}


resource "azurerm_cdn_frontdoor_route" "default_route" {
  name                            = "default"
  cdn_frontdoor_endpoint_id       = azurerm_cdn_frontdoor_endpoint.web_endpoint.id
  cdn_frontdoor_origin_group_id   = azurerm_cdn_frontdoor_origin_group.origin_group_web.id
  cdn_frontdoor_origin_ids        = [azurerm_cdn_frontdoor_origin.web_origin.id]
  cdn_frontdoor_rule_set_ids      = [azurerm_cdn_frontdoor_rule_set.rule_set.id]
  enabled                         = true
  cdn_frontdoor_custom_domain_ids = [azurerm_cdn_frontdoor_custom_domain.ihelpyoutodo_domain.id]
  forwarding_protocol             = "MatchRequest"
  https_redirect_enabled          = true
  patterns_to_match               = ["/*"]
  supported_protocols             = ["Http", "Https"]
  link_to_default_domain          = false
}


resource "azurerm_cdn_frontdoor_custom_domain" "ihelpyoutodo_domain" {
  name                     = "yourdomain"
  cdn_frontdoor_profile_id = azurerm_cdn_frontdoor_profile.fqdn_profile.id
  host_name                = "www.yourdomain.com"

  tls {
    certificate_type    = "ManagedCertificate"
    minimum_tls_version = "TLS12"
  }
}


resource "azurerm_cdn_frontdoor_custom_domain_association" "domain_association" {
  cdn_frontdoor_custom_domain_id = azurerm_cdn_frontdoor_custom_domain.ihelpyoutodo_domain.id
  cdn_frontdoor_route_ids        = [azurerm_cdn_frontdoor_route.default_route.id]
}
After deploying Azure Front Door, the next step is to configure a custom domain to serve our website.
Step 3: Configure a Custom Domain
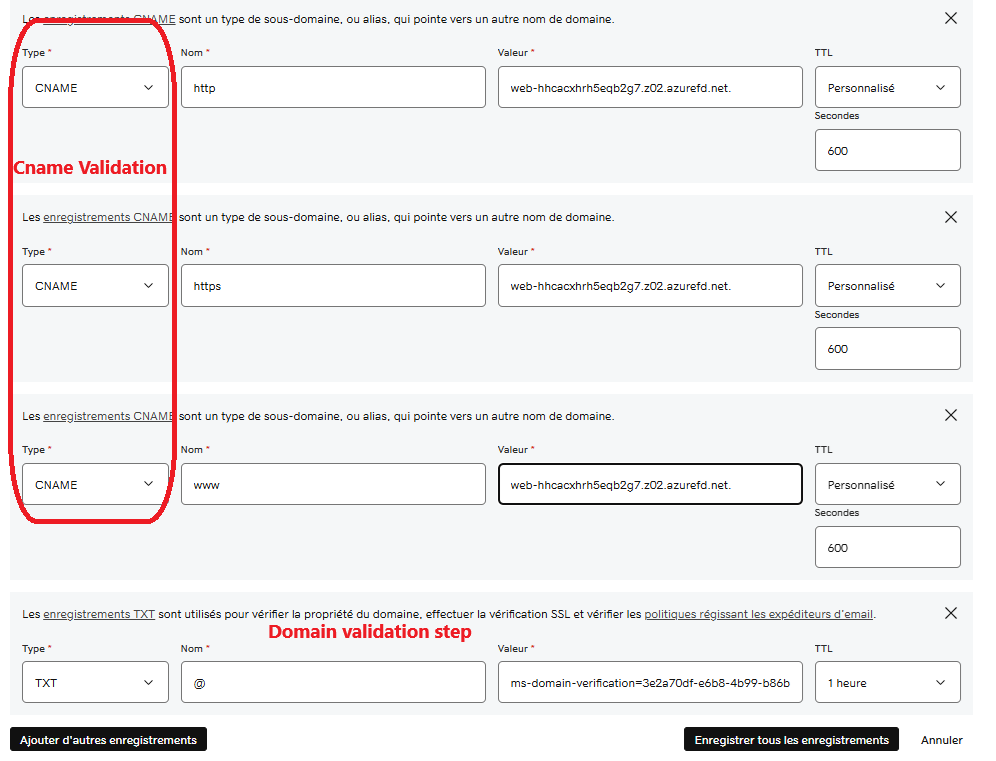
To configure a custom domain, we need to make some changes in our DNS provider (in my case, GoDaddy). The first step is to add a TXT record in the domain’s DNS settings to validate the domain in Azure.
Ps : After you add the Text record , you need also to add 3 cname record that point to your front door default root that end with : .azurefd.net else you will have this error

Domain Validation Process
All domains added to Azure Front Door must be validated. This ensures protection against accidental misconfigurations and prevents domain spoofing. In some cases, Azure prevalidates the domain if it’s already verified by another Azure service. Otherwise, you must manually validate the domain following Azure’s verification steps.
One feature I really appreciate is that Azure Front Door can automatically manage TLS certificates for both subdomains and apex domains. With managed certificates:
- You don’t need to create, store, or manually install certificates.
- Azure automatically renews certificates, preventing downtime due to expired SSL certificates.
Note: The process of generating, issuing, and installing a managed TLS certificate can take several minutes to an hour, sometimes longer.
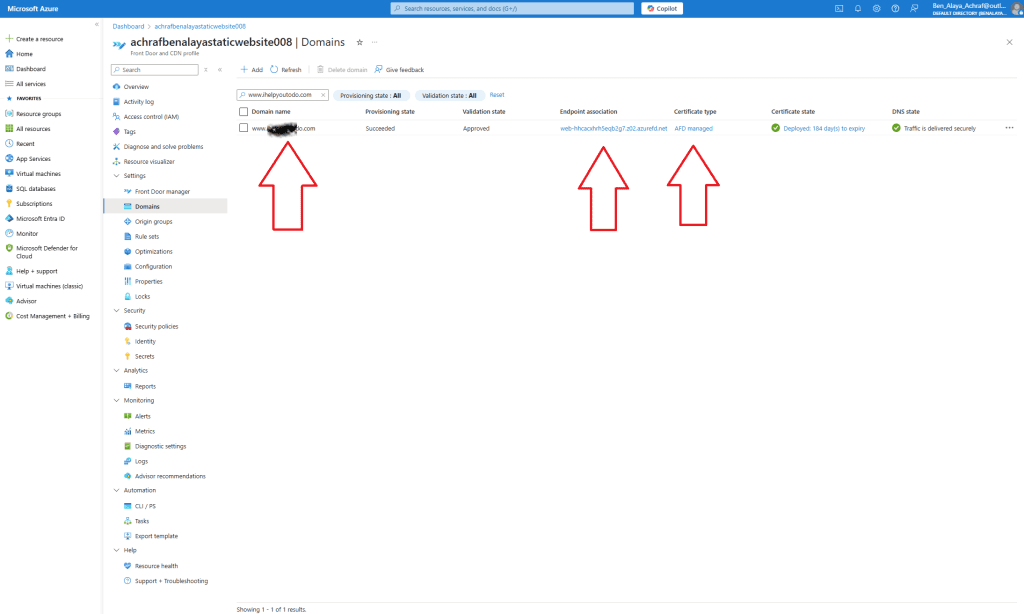
Once the domain is validated, you’ll see a status of Approved, and the TLS certificate will be deployed.
Final Step: Accessing the Website
Now that everything is set up, we can visit our website using our custom domain, benefiting from Azure’s global load balancing, caching, and security features!
Conclusion
In this tutorial, we successfully deployed a static website on Azure using Terraform. We:
- Created a Storage Account with static website hosting enabled.
- Deployed Azure Front Door to provide global load balancing, security, and performance improvements.
- Configured a custom domain and enabled managed TLS certificates.
This setup ensures high availability, security, and performance while keeping things simple with Terraform automation. Let me know if you have any questions or if you’d like a deeper dive into any of these steps!