Introduction
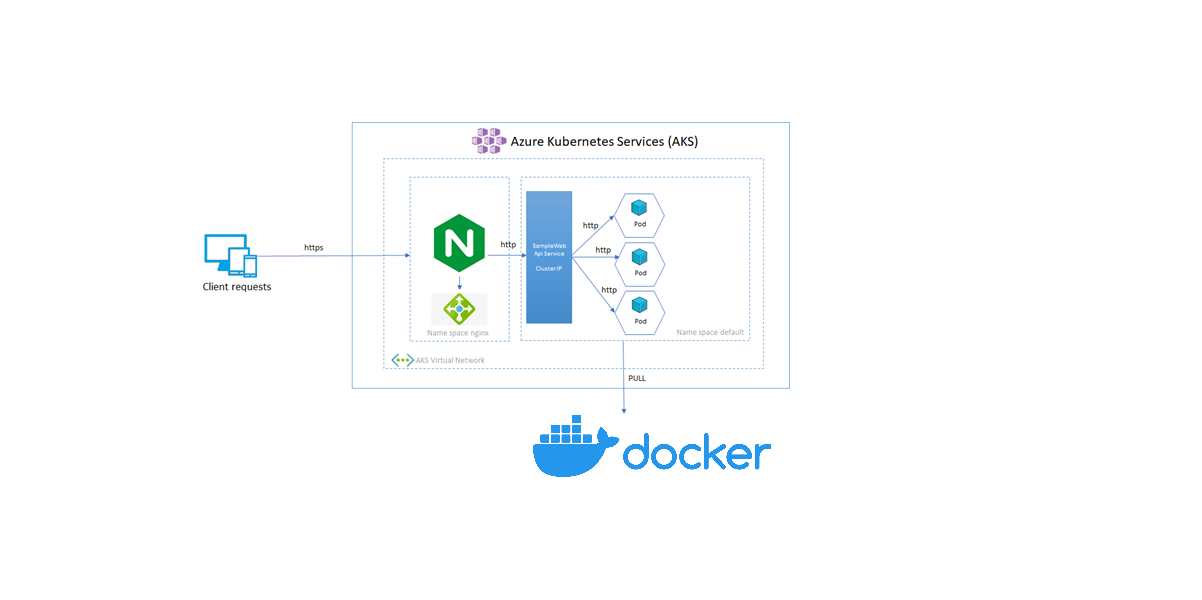
In a previous article, we looked at how to set up nginx as a reverse proxy for aspnet core apps, both with and without Docker compose. In this new blog post, we’ll look at how to use kubernetes in the Azure cloud to do the same task.
Prerequisites
- Visual studio or visual studio code (to run the solutions)
- A command line /Terminal
- Terraform
- Azure Account
You are free to create the infrastructure using the Azure portal, but as I mentioned, we’ll be utilizing Terraform to create the infrastructure as code .
Part 1 – Terraform & azure kubernetes as a service AKS
Here, we’ll use Terraform to create a straightforward Kubernetes cluster. You may access the complete source code at this github repository link.
main.tf
Currently, a kubernetes cluster and an azure log analytics workspace are in place in main.tf to watch over our cluster and containers.
# Generate random resource group name
resource "random_pet" "rg_name" {
  prefix = var.resource_group_name_prefix
}

resource "azurerm_resource_group" "rg" {
  location = var.resource_group_location
  name     = "${random_pet.rg_name.id}-${var.env_name}"
}

resource "random_id" "log_analytics_workspace_name_suffix" {
  byte_length = 8
}

resource "azurerm_log_analytics_workspace" "insights" {
  location = var.log_analytics_workspace_location
  # The WorkSpace name has to be unique across the whole of azure;
  # not just the current subscription/tenant.
  name                = "${var.log_analytics_workspace_name}-${random_id.log_analytics_workspace_name_suffix.dec}"
  resource_group_name = azurerm_resource_group.rg.name
  sku                 = var.log_analytics_workspace_sku
}

resource "azurerm_log_analytics_solution" "insights" {
  location              = azurerm_log_analytics_workspace.insights.location
  resource_group_name   = azurerm_resource_group.rg.name
  solution_name         = "ContainerInsights"
  workspace_name        = azurerm_log_analytics_workspace.insights.name
  workspace_resource_id = azurerm_log_analytics_workspace.insights.id

  plan {
    product   = "OMSGallery/ContainerInsights"
    publisher = "Microsoft"
  }
}

#aks
resource "azurerm_kubernetes_cluster" "cluster" {
  name = var.cluster_name
  #kubernetes_version  = data.azurerm_kubernetes_service_versions.current.latest_version
  location             = azurerm_resource_group.rg.location
  resource_group_name  = azurerm_resource_group.rg.name
  dns_prefix           = var.dns_prefix
  azure_policy_enabled = true
  # microsoft_defender {

  #   log_analytics_workspace_id = azurerm_log_analytics_workspace.insights.id

  # }

 oms_agent {
    log_analytics_workspace_id = azurerm_log_analytics_workspace.insights.id
  }
  tags = {
    Environment = var.env_name
  }

  default_node_pool {
    name       = "agentpool"
    node_count = var.agent_count
    vm_size    = "standard_d2_v2"
  }

  identity {
    type = "SystemAssigned"
  }


}
providers.tf
A Terraform plugin called a provider enables users to control an external API. Terraform can communicate with a wide variety of cloud providers, databases, and services thanks to provider plugins like the azure provider and the cloud-init provider, which serve as a translation layer.
terraform {
  required_version = ">=1.0"

  required_providers {
    azurerm = {
      source  = "hashicorp/azurerm"
      version = "~>3.0"
    }
    random = {
      source  = "hashicorp/random"
      version = "~>3.0"
    }
  }
}

provider "azurerm" {
  features {}
}
Part 2 -Deployment on Azure AKS
As previously said, we will use Kubernetes Deployment YAML to deploy the dotnet application and the nginx load balancer .
A Kubernetes Deployment YAML specifies the configuration for a Deployment object—this is a Kubernetes object that can create and update a set of identical pods. Each pod runs specific containers, which are defined in the spec. template field of the YAML configuration.
01-backend-deployment.yml
Here, we define the DotNet application that will be made available on port 5000 (Exposed to the Service on a cluster-internal IP).
ClusterIP: Exposes the Service on a cluster-internal IP. Choosing this value makes the Service only reachable from within the cluster. This is the default that is used if you don’t explicitly specify atypefor a Service.
Dans ce cas un client envoie une requête à l’adresse IP stable (nginx), et la requête est acheminée vers l’un des pods du service
apiVersion: apps/v1
kind: Deployment
metadata:
  name: backend-restapp
  labels:
    app: backend-restapp
    tier: backend
spec:
  replicas: 4
  selector:
    matchLabels:
      app: backend-restapp
  template:
    metadata:
      labels:
        app: backend-restapp
        tier: backend
    spec:
      containers:
        - name: backend-restapp
          image: ben2code/backend:latest
          ports:
            - containerPort: 5000
02-backend-clusterip-service.yml
apiVersion: v1
kind: Service
metadata:
  name: my-backend-service ## VERY VERY IMPORTANT - NGINX PROXYPASS needs this name
  labels:
    app: backend-restapp
    tier: backend
spec:
  #type: ClusterIP is a default service in k8s
  selector:
    app: backend-restapp
  ports:
    - name: http
      port: 5000 # ClusterIP Service Port
      targetPort: 5000 # Container Port
03-frontend-deployment.yml
apiVersion: apps/v1
kind: Deployment
metadata:
  name: frontend-nginxapp
  labels:
    app: frontend-nginxapp
    tier: frontend
spec:
  replicas: 1
  selector:
    matchLabels:
      app: frontend-nginxapp
  template:
    metadata:
      labels:
        app: frontend-nginxapp
        tier: frontend
    spec:
      containers:
        - name: frontend-nginxapp
          image: ben2code/frontend:latest
          ports:
            - containerPort: 80
04-frontend-LoadBalancer-service.yml
For the frontend we will exposes the Service externally using load balancer.
apiVersion: v1
kind: Service
metadata:
  name: frontend-nginxapp-loadbalancer-service
  labels:
    app: frontend-nginxapp
    tier: frontend
spec:
  type: LoadBalancer # ClusterIp, # NodePort
  selector:
    app: frontend-nginxapp
  ports:
    - name: http
      port: 80 # Service Port
      targetPort: 80 # Container Port
Run the following commands to carry out the deployments:
kubectl create -f  my-namespace.yaml
kubectl config set-context --current --namespace=hellonginxdotnet
kubectl apply -f 01-backend-deployment.yml -f 02-backend-clusterip-service.yml
kubectl apply -f 03-frontend-deployment.yml -f 04-frontend-LoadBalancer-service.yml
Part 3 -Results
Let’s first examine our environment :

As you can see, we produced 4 replicas for the backend and 1 pod for the frontend.
If you’d rather view the outcome from the command line, do this:
kubectl get pods
and the outcomes:

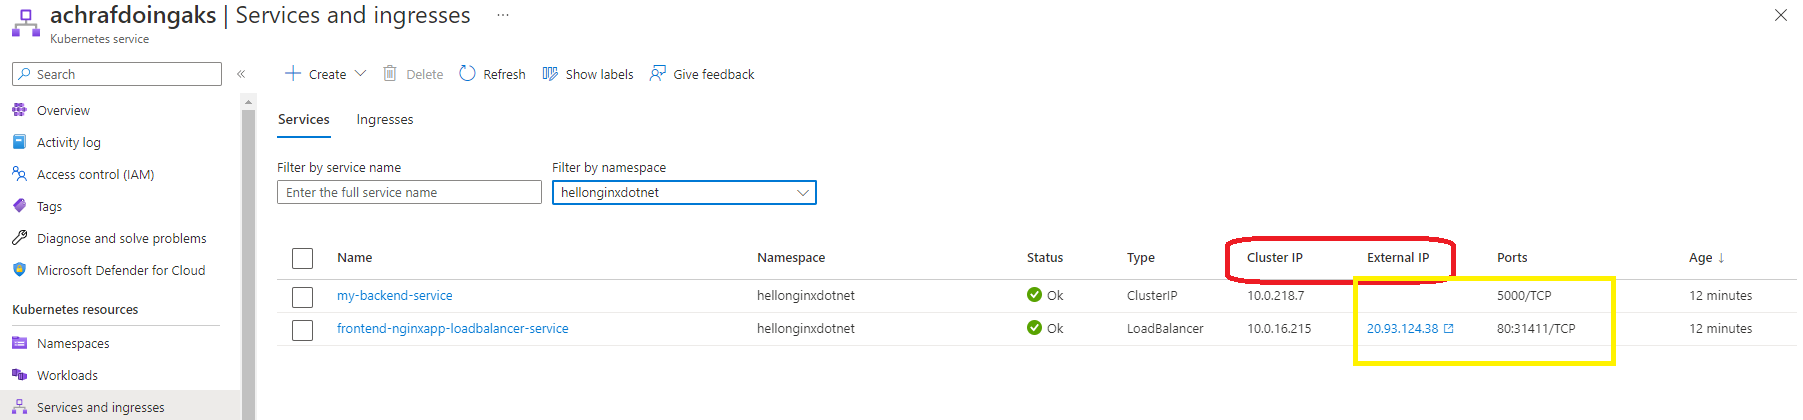
Now, in order to access the URL for our application, we must locate the loadbalancer’s IP address.
kubectl get services
 or you can use the portal under Services and ingresses
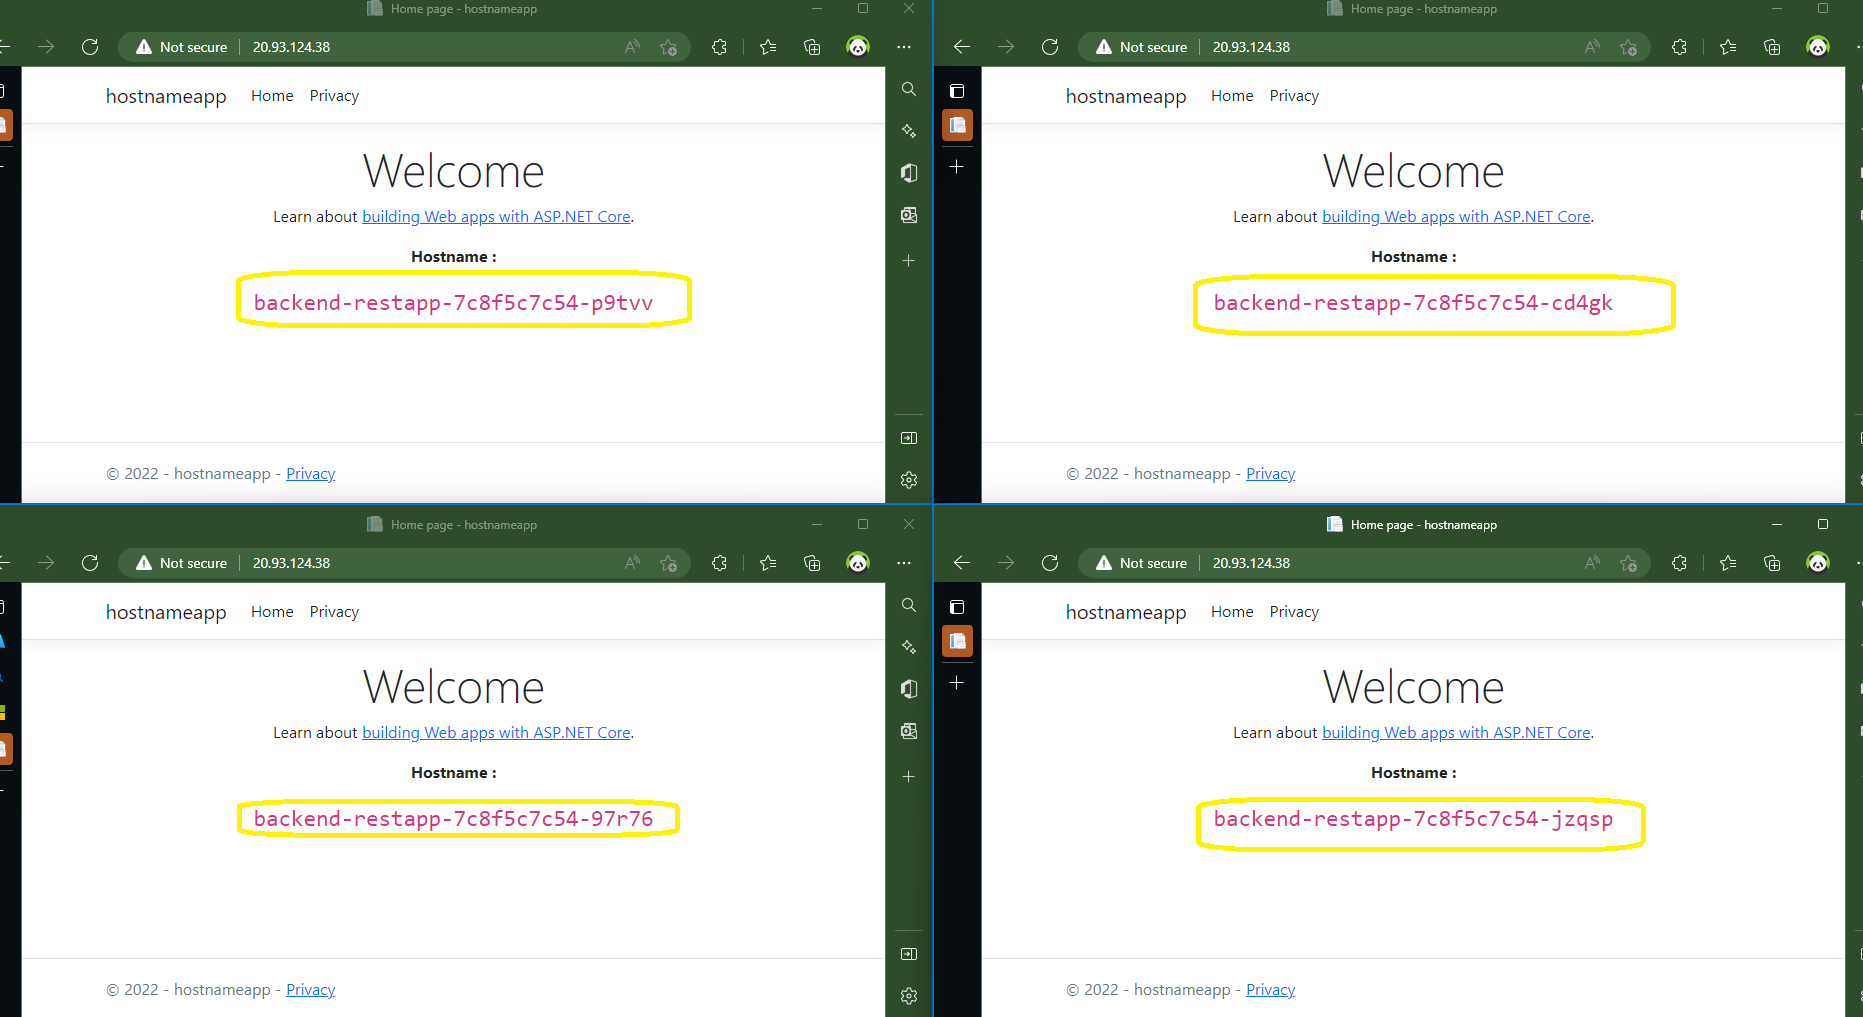
 We shall now access our external IP to view the outcomes.

If we refresh the page now, we will see various hostnames.
That was the outcome of this demonstration; while it was fine, it would be even better if we used ingress controller in AKS, which will be covered in the next blog post with Https too.
Source code : http://bit.ly/3V8Bs80


Comments 5