It’s been a while since I started talking about the Model Context Protocol (MCP) how it works, how to integrate it, and how much it can simplify your workflow. I’ve been experimenting with MCP clients, exploring agent mode, even creating custom modes, and sharing everything I learn along the way. The more I dive into MCP, the more fascinated I become, and I love showing others just how powerful it is.
Up until now, I’ve mainly been using existing MCP servers. But at some point the real question arrives:
How do you build your own MCP server? Where do you host it? And how do you actually use it in real projects?
That’s exactly what led me here. I wanted to create my first MCP server from scratch. While exploring different approaches, I came across several sample repositories in Azure-samples. Since I’m a long-time C# developer, my first instinct was to build a server using Azure Functions + C# totally in my comfort zone.
But this time, I made a promise to myself: step outside the comfort zone.
And after watching many presentations by the amazing Pamela Fox, I said why not Python for this first example?
So in this blog post, we’re going to build a simple expense-tracker MCP server using Python, deploy it as an Azure Function, and test it using MCP Inspector and VS Code’s MCP extension.
You’ll find a clear, step-by-step guide including:
✅ Cloning the repo : https://github.com/achrafbenalaya/expensetrackermcpserver
✅ Writing the server logic
✅ Creating & deploying the Azure Function
✅ Testing it locally and in VS Code with MCP Inspector
If you enjoy this walkthrough, feel free to share it and if you’d like to support my content, you can buy me a coffee here: buymeacoffee.com/ben2code ☕✨
✅ Prerequisites to follow along
To build and test this project, make sure you have:
- VS Code
- MCP Inspector
- Python
- Browser
- Docker (optional I’ll show how to run without it)
- Azure account with permissions to create Azure Functions
- And of course… an internet connection 😄
Alright let’s jump right in.
When you walk into a car showroom, you don’t start by asking about the engine specs, compression ratio, or fuel injection system. First, you want to see the car. You look at the design, step inside, feel the seats, maybe even take it for a quick test drive. Only after that do you start digging into the technical details.
We’re going to take the exact same approach here.
Before diving into code, architecture, Azure Functions, or deployment pipelines, let me show you the final result what the MCP server can actually do once it’s up and running.
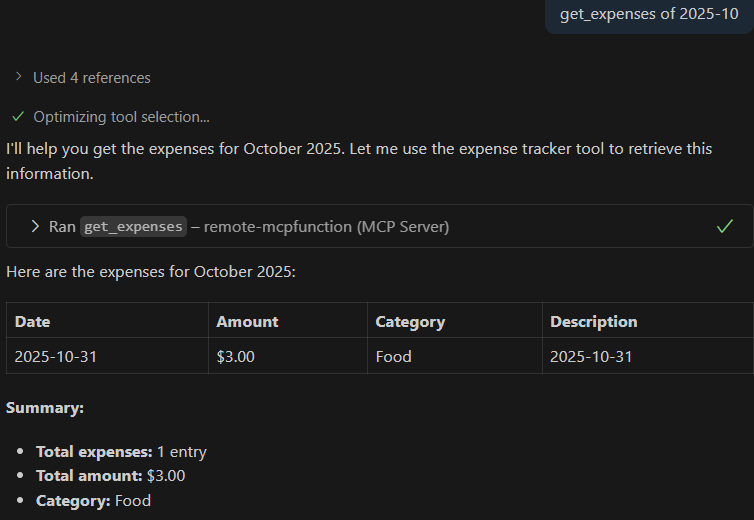
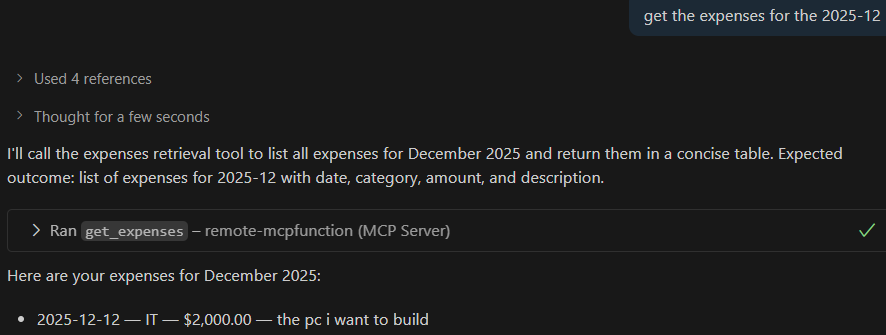
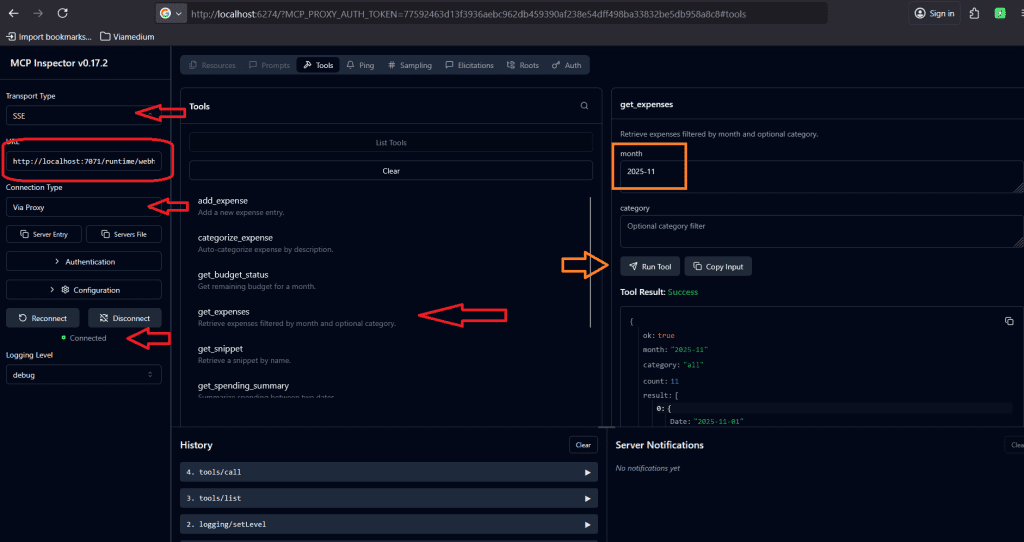
🛠️ Tool #1: get_expenses
This first tool simply retrieves your saved expenses a clean, structured way to read your stored data through MCP. Think of it like opening your car’s dashboard to see your mileage and trip history before we start checking the engine.
Let’s take a look at how it works in action 👇

Simply here i was asking for my expenses for the month of October for the year 2025
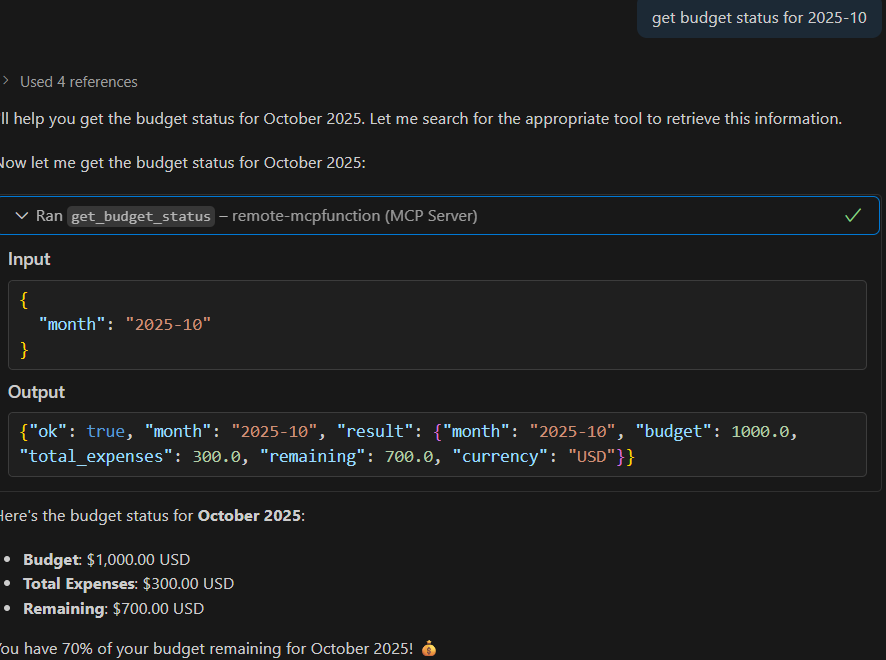
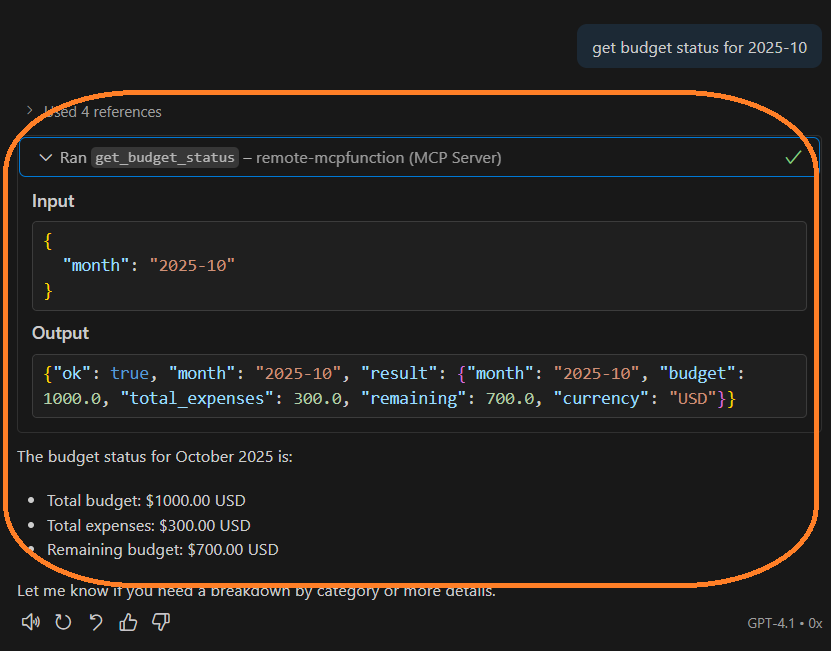
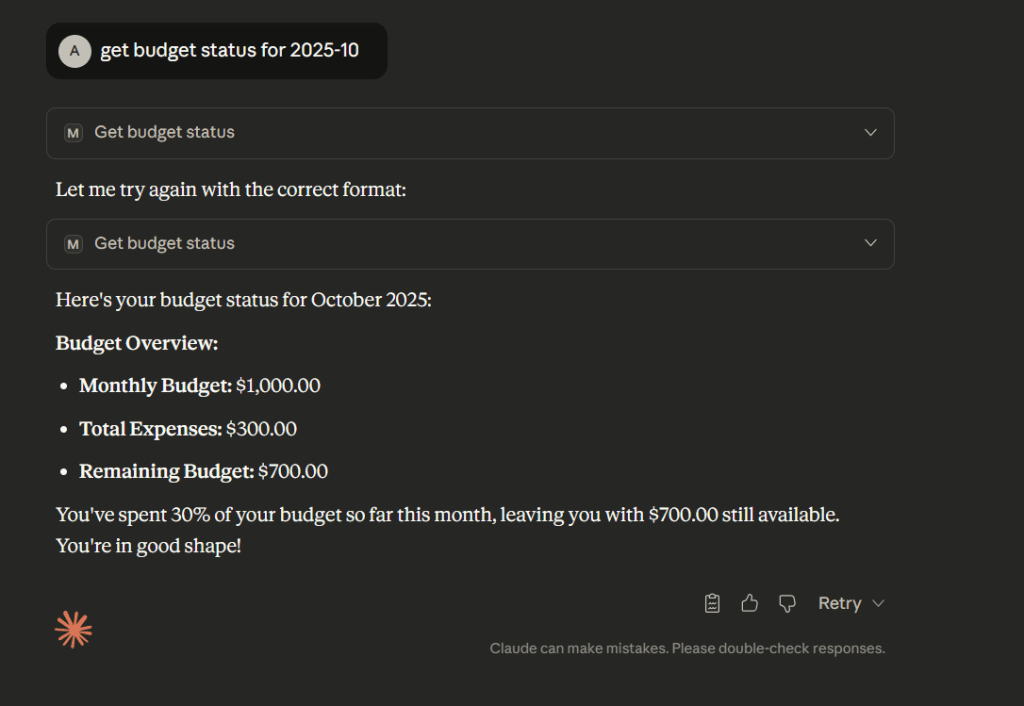
🛠️ Tool #2: get_budget
The second tool gives us visibility into our monthly budget.
For the demo, I’ve set the default budget to $1000 per month. Later, we’ll make this more flexible by storing the budget in an environment variable which means you’ll be able to adjust it per month, per environment, or even per user without touching the code.Think of this tool like checking the car’s fuel range before a road trip you need to know how far you can go before running out 😄
This command simply returns your current budget value, so you always have a clear reference point before adding or reviewing expenses.
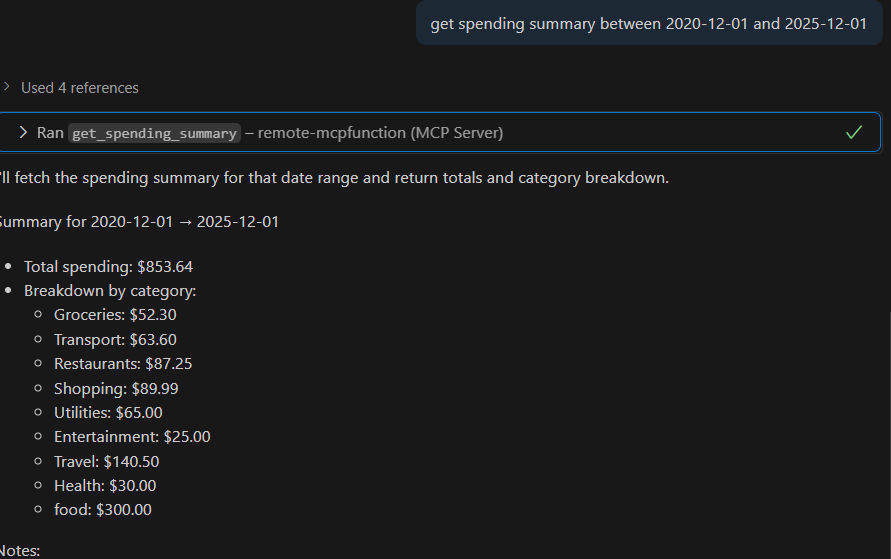
🛠️ Tool #3: get_spending_summary
This tool gives you a summary of your spending over a specific time range.
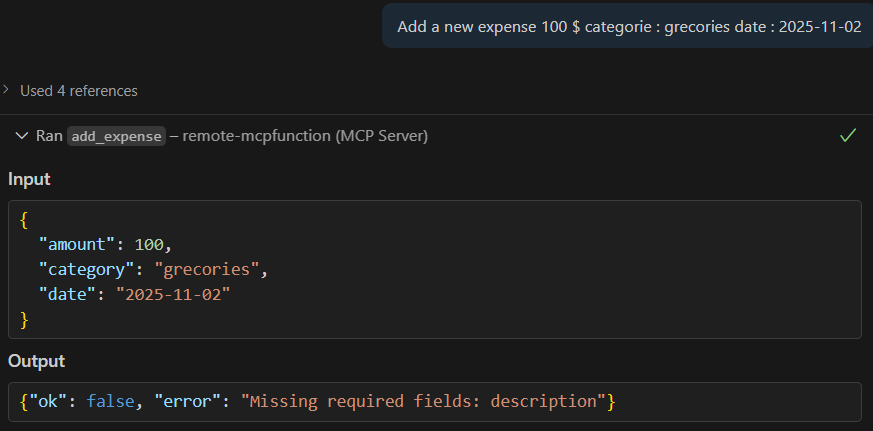
🛠️ Tool #4: add_expense
Now that we can read our budget and existing data, it’s time for the fun part adding new expenses.
This tool allows you to record a new expense with all the important details: category, amount, description, and date.
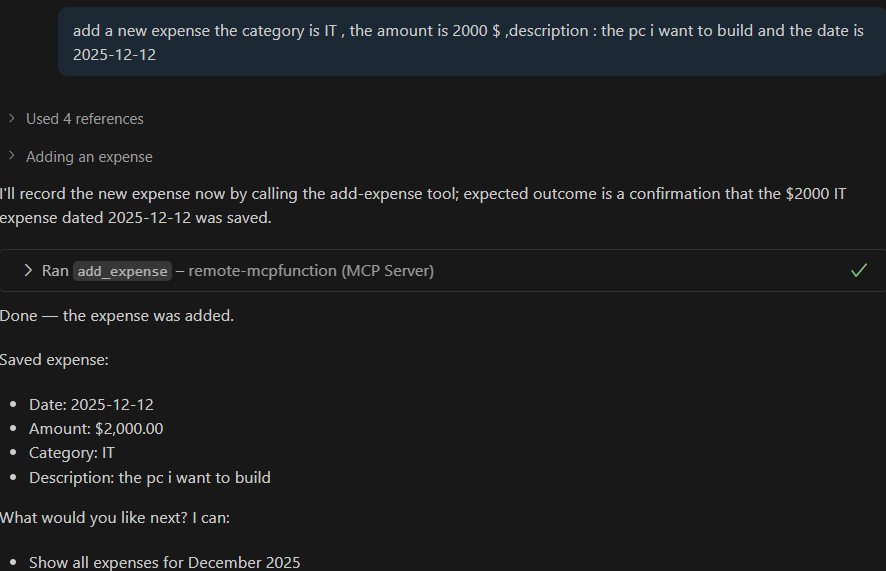
Let’s check if the record is added :
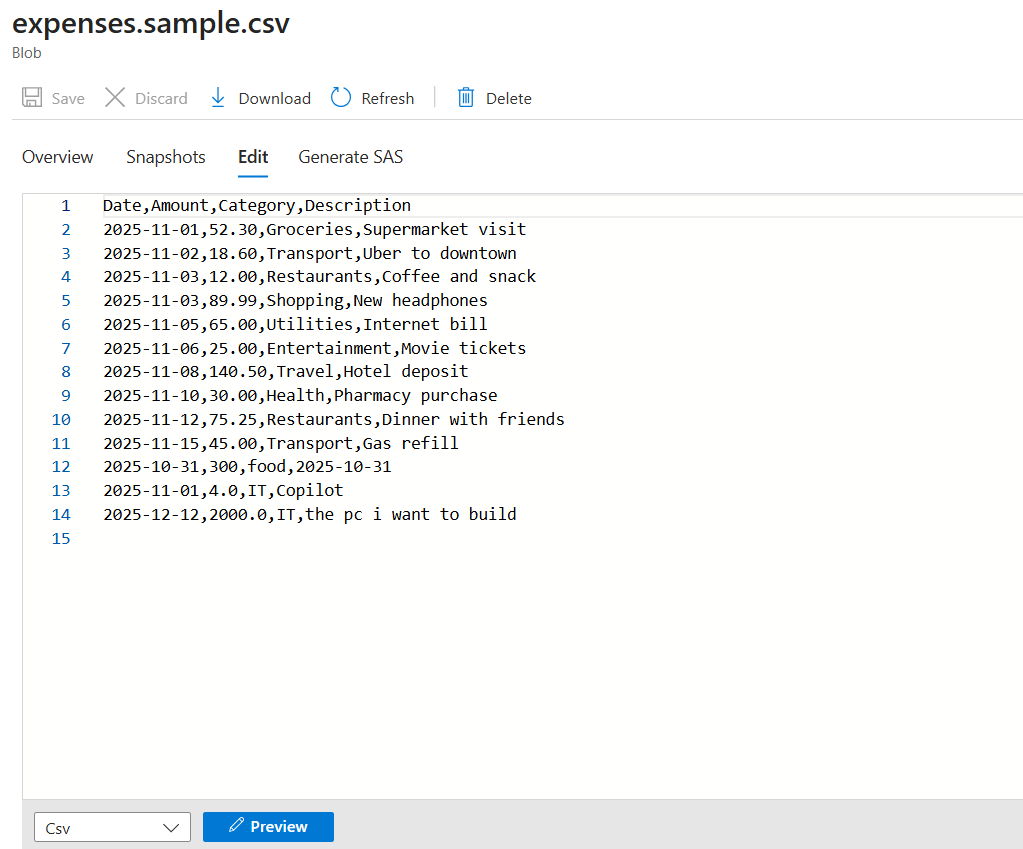
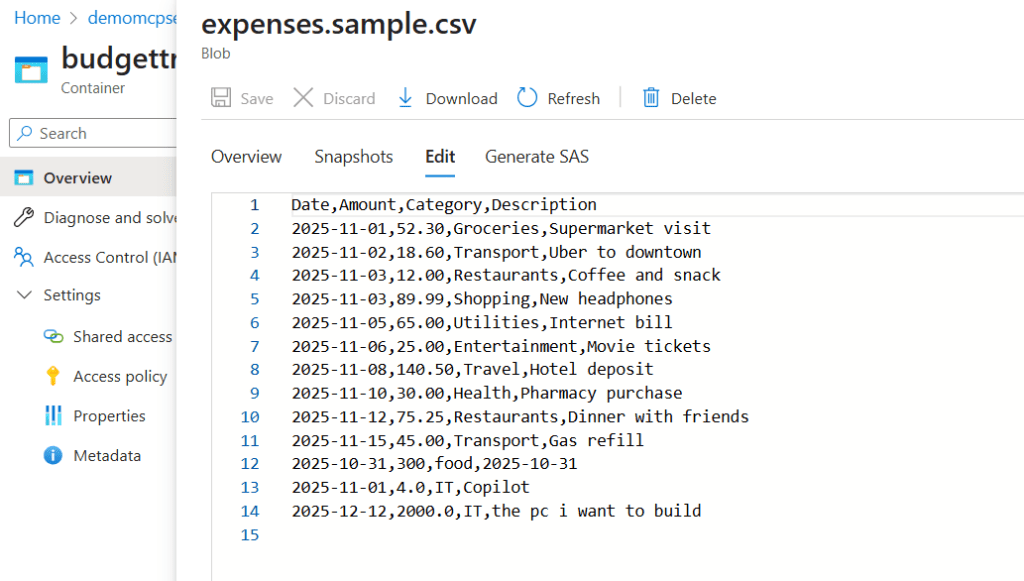
But wait where is all this data actually stored?
Behind the scenes, everything is saved in an Azure Storage account, inside a Blob as a CSV file. Simple, lightweight, and easy to query.
🧱 Project Overview How We Built This MCP Server
Now that you’ve seen the final result, let’s open the hood and see how everything works under the engine. In this section, we’ll walk through:
- Where the project skeleton came from
- What was modified and why
- How the MCP server was implemented in Python
- How we deployed it to Azure Functions
- The configuration (environment variables, Storage, Blob, etc.)
- How we tested locally and in the cloud
- Tools used along the way (MCP Inspector, VS Code, Claude Desktop, etc.)
Let’s break it down step-by-step 👇
1️⃣ Pulling the Base Template (Source Repo)
I started by cloning the official Model Context Protocol example repository from Azure-Samples, which provides a clean starting point for building MCP servers.
It gave me a Python-based skeleton so I could focus on extending the logic instead of building everything from scratch.
repo url =====> Azure-Samples/remote-mcp-functions-python
Full functionel repo ===> https://github.com/achrafbenalaya/expensetrackermcpserver
git clone https://github.com/Azure-Samples/remote-mcp-functions-python.git
2️⃣ Understanding the Starter Code & Modifying It
From the base template, I:
- Reviewed the MCP handler logic
- Created new MCP tools (get_budget, get_expenses, add_expense, get_spending_summary)
- Integrated Azure Blob Storage as the backend
- Added CSV read/write operations
- Structured responses to match MCP protocol expectations
Basically , I built a lightweight expense-tracking service in Python backed by Azure Blob Storage no pandas required. It handles both CSV and XLSX formats, includes reliable date and amount parsing, supports dynamic monthly budgets via environment variables, and provides simple rule-based expense categorization. Each capability is implemented as small, testable functions and exposed as MCP tools (get_expenses, add_expense, get_budget_status, get_spending_summary, categorize_expense).
I’ll first explain, in plain steps, how the existing “get all expenses” tool was added (what the method does and why). Then I’ll show a minimal example of adding a new simple “hello world” tool — both the class method and a small HTTP wrapper you can drop into an Azure Functions HTTP trigger or run locally.
How the “get all expenses” tool was added short, concrete steps
What we added: a public method get_expenses(month: str, category: Optional[str] = None) -> List[Dict] on ExpenseTracker.
Why: expose a small, testable API that lists expenses for a given month (and optional category) in a JSON-serializable format so it can be used by MCP tools, HTTP endpoints, or scripts.
Implementation summary :
- Input normalization:
_parse_yyyymm(month)accepts “YYYY-MM” or “YYYYMM” and normalizes to “YYYY-MM”. This makes the interface robust to common formats.
- Read source of truth:
- Calls
self._download_rows()which fetches the blob (XLSX or CSV) from the configured container and returns rows as dicts. If the blob is missing,_download_rows()returns an empty list.
- Calls
- Iterate and filter:
- For each row, read the
Datefield. The code accepts:- Excel date objects (openpyxl returns
datetime/date), datetimeobjects,- or ISO date strings “YYYY-MM-DD”.
- Excel date objects (openpyxl returns
- Convert/normalize to a
date, buildrow_month = "YYYY-MM"and compare with the requested month. - If
categoryis supplied, compare case-insensitively and skip non-matching rows.
- For each row, read the
- Normalize fields:
- Ensure
Amountis cast tofloat()(on failure fallback to 0.0). - Ensure
CategoryandDescriptionare strings.
- Ensure
- Return shape:
- A list of dicts like:
- { “Date”: “YYYY-MM-DD”, “Amount”: float, “Category”: str, “Description”: str }
- This JSON-friendly shape is easy to serialize as an HTTP response or an MCP tool return.
- A list of dicts like:
Error/edge behavior:
- If month format invalid →
_parse_yyyymmraises ValueError. - If no blob exists → returns [] (safe).
- Bad amount strings → amount becomes 0.0 for listing (but
add_expenseraises ValueError for invalid amounts).
How it becomes a “tool” (exposure options)
- Direct use in scripts: instantiate
ExpenseTracker()and callget_expenses("2025-12"). - Wrap as HTTP endpoints (Azure Functions) where the function handler instantiates
ExpenseTracker()and returns the list as JSON. - Register it as an MCP tool wrapper (the repository already contains tooling that triggers these methods) the method contract is intentionally simple (primitive types + JSON-serializable results).
example below the get_expenses function
def get_expenses(self, month: str, category: Optional[str] = None) -> List[Dict[str, Any]]:
    month = _parse_yyyymm(month)
    rows = self._download_rows()
    result = []
    for r in rows:
        d = r.get("Date")
        if not d:
            continue
        if isinstance(d, datetime):
            ddate = d.date()
        elif isinstance(d, date):
            ddate = d
        else:
            try:
                ddate = datetime.strptime(str(d), "%Y-%m-%d").date()
            except Exception:
                continue
        row_month = f"{ddate.year:04d}-{ddate.month:02d}"
        if row_month != month:
            continue
        cat = r.get("Category") or ""
        if category and str(cat).strip().lower() != category.strip().lower():
            continue
        amount = r.get("Amount", 0.0)
        try:
            amount = float(amount)
        except Exception:
            amount = 0.0
        result.append({
            "Date": ddate.isoformat(),
            "Amount": amount,
            "Category": str(cat),
            "Description": str(r.get("Description", "")),
        })
    return result
Where the tool is declared ?
in this part we define the new tool and we call the function
@app.generic_trigger(
    arg_name="context",
    type="mcpToolTrigger",
    toolName="get_expenses",
    description="Retrieve expenses filtered by month and optional category.",
    toolProperties=tool_properties_get_expenses_json,
)
def get_expenses(context) -> str:
    ...
Input the tool expects
The function receives a single context parameter which is a JSON string (the trigger payload). The function parses it like this:
content = json.loads(context)
month = content.get(“arguments”, {}).get(“month”)
category = content.get(“arguments”, {}).get(“category”)
So the caller should send a JSON payload shaped like:
{
  "arguments": {
    "month": "2025-12",
    "category": "IT"            // optional
  }
}
wrapper function :
- Parse
contextJSON and extractmonthand optionalcategory. - Validate required
monthargument. If missing, return a JSON error object. - Call the underlying tool method:
- Uses
_get_tracker()to get a singletonExpenseTrackerinstance. - Calls
_get_tracker().get_expenses(month=month, category=category).
- Uses
- Wrap the result in a uniform response object and return it as JSON string:
return json.dumps({
    "ok": True,
    "month": month,
    "category": category or "all",
    "count": len(result) if isinstance(result, list) else 0,
    "result": result
})
Sequence :
Client (MCP caller / script)
-> sends JSON context to MCP trigger
-> function_app.get_expenses(context) wrapper
-> parses JSON, validates month
-> calls _get_tracker().get_expenses(month, category)
-> ExpenseTracker.get_expenses(...)
-> _download_rows() reads blob (XLSX/CSV) <– Azure Blob Storage
<- rows
<- filtered/normalized result
<- wrapper returns JSON string { ok, month, count, result }
In the repo you will find readme file that will explain full code , so no worries.
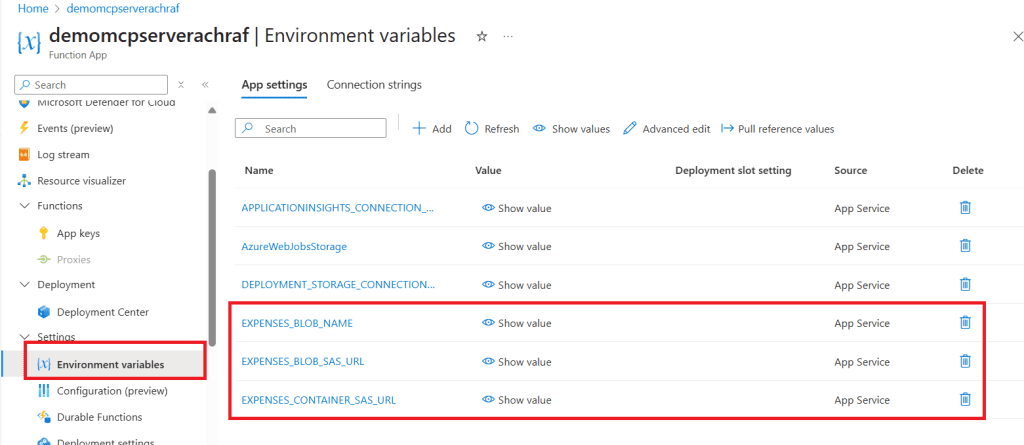
3️⃣ Adding Environment Variables
To keep settings flexible and secure, I added environment variables for:
| Variable | Purpose |
|---|---|
AZURE_STORAGE_CONNECTION_STRING | Connect to Storage account |
EXPENSES_CONTAINER_SAS_URL | Where expenses CSV lives : container Saas Access |
EXPENSES_BLOB_NAME | CSV filename |
EXPENSES_BLOB_SAS_URL | Blob Saas Access |
4️⃣ Local Development & Testing
To test everything locally, I used:
✅ VS Code : to code and run the azure function => Download here
✅ Python : because we are using python for this demo
✅ Azure Functions Core Tools : Azure Functions Core Tools lets you develop and test your functions on your local computer
✅ MCP Inspector (to simulate LLM connection) : MCP Inspector will be used later for testing .
it can be launched via the cmd : npx @modelcontextprotocol/inspector
Once you run it you can browse : http://127.0.0.1:6274/#resources to see the mcp inspector home page and you can connect to your function app by inserting this link to
http://localhost:7071/runtime/webhooks/mcp/sse to the URL and set
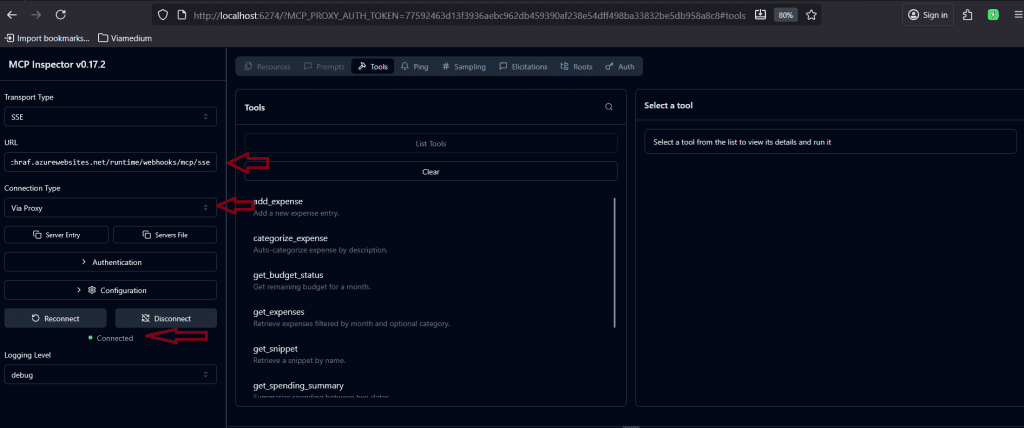
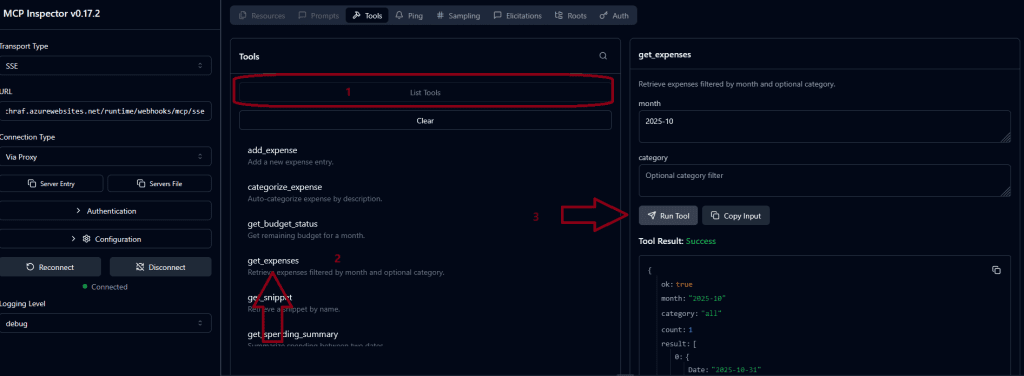
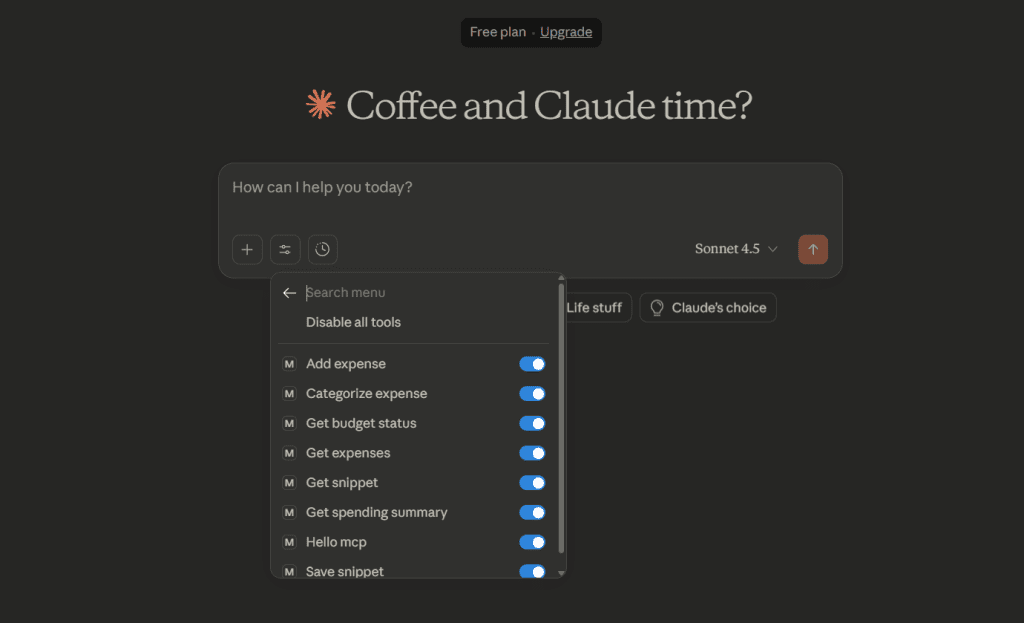
You can choose any tool and test it from the List Tools :
✅ An storage emulator : An storage emulator is needed when developing azure function app in VScode : Azurite emulator for local Azure Storage development
You can run the Azurite in VS Code : C:\Program Files\Microsoft Visual Studio\2022\Enterprise\Common7\IDE\Extensions\Microsoft\Azure Storage Emulator> .\azurite.exe
or Using Docker : docker run -p 10000:10000 -p 10001:10001 -p 10002:10002 mcr.microsoft.com/azure-storage/azurite

5️⃣ Deploying to Azure Functions
Once everything worked locally:
- Created an Azure Function App
- Pushed the code via VS Code deployment
- Added same environment variables in Azure portal
- Uploaded/created the blob file for storage
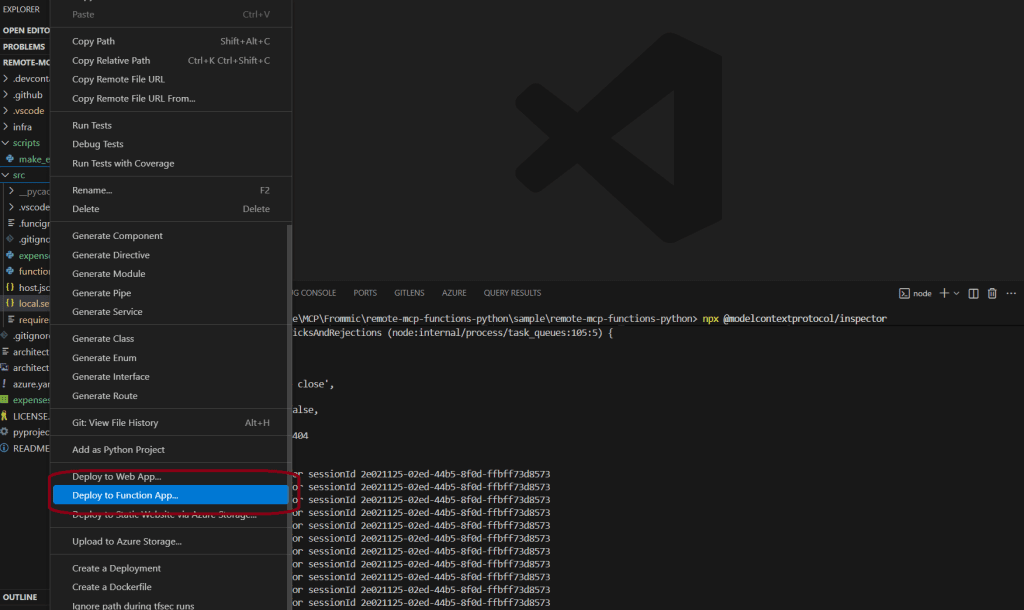
The simplest way to deploy an azure function via vs code is to click on it and select : Deploy to function app (As I’m writing this article, I’m also planning to prepare a Terraform version of this Azure Function to streamline and automate the deployment process.)

Once the app is deployed , you can see the tools by clicking on functions from the portal :

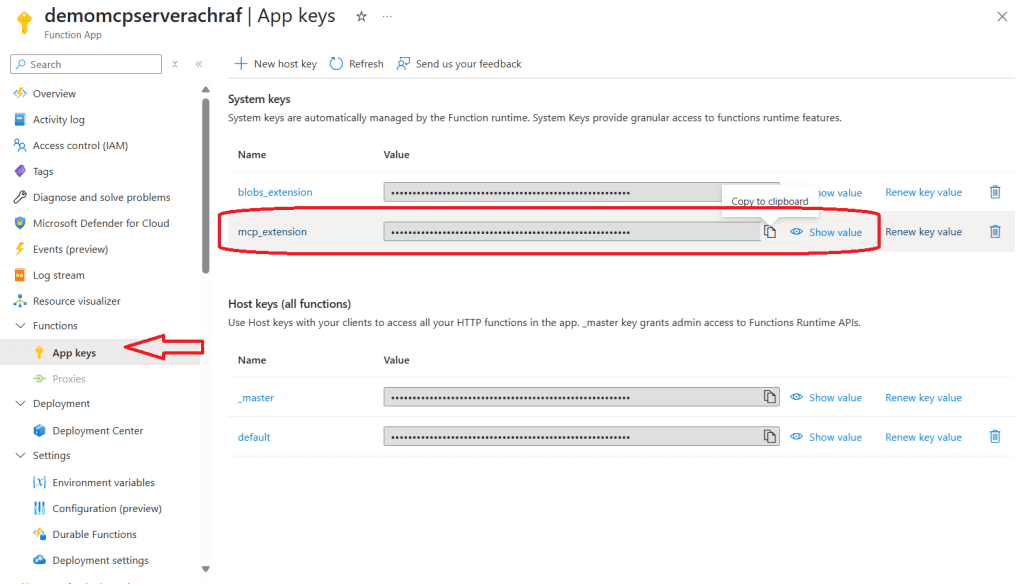
Now before we go and test on MCP inspector or vs code we need to copy the system keys to use (not the best practice for now ,but its for the demo) .
where to find it ? simply go to App Keys and copy the mcp_extension key and save it .
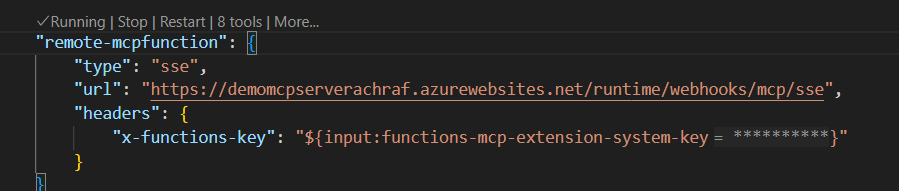
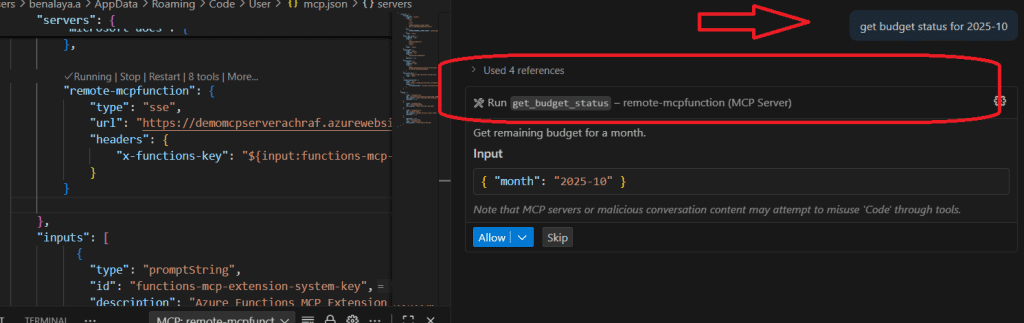
If you’re familiar with the Model Context Protocol and how servers work with it, you know that we need an mcp.json file to define the MCP servers we plan to use.
{
    "inputs": [
        {
            "type": "promptString",
            "id": "functions-mcp-extension-system-key",
            "description": "Azure Functions MCP Extension System Key",
            "password": true
        },
        {
            "type": "promptString",
            "id": "functionapp-name",
            "description": "Azure Functions App Name"
        }
    ],
    "servers": {
        "remote-mcp-function": {
            "type": "sse",
            "url": "https://${input:functionapp-name}.azurewebsites.net/runtime/webhooks/mcp/sse",
            "headers": {
                "x-functions-key": "${input:functions-mcp-extension-system-key}"
            }
        },
        "local-mcp-function": {
            "type": "sse",
            "url": "http://0.0.0.0:7071/runtime/webhooks/mcp/sse"
        }
    }
}
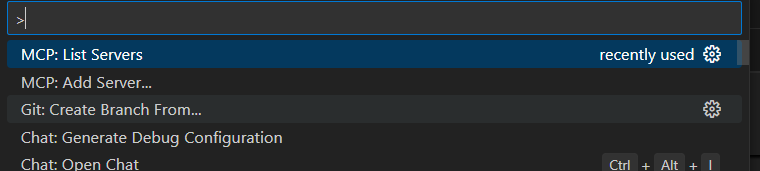
You can add a new server always by using the CTRL+shift +P
Storage account :
I have uploaded a simple csvp file to a storage account on azure and i genrated SAS token for the blob and for the container of the blob


Generate two sas and save them because we will use them later
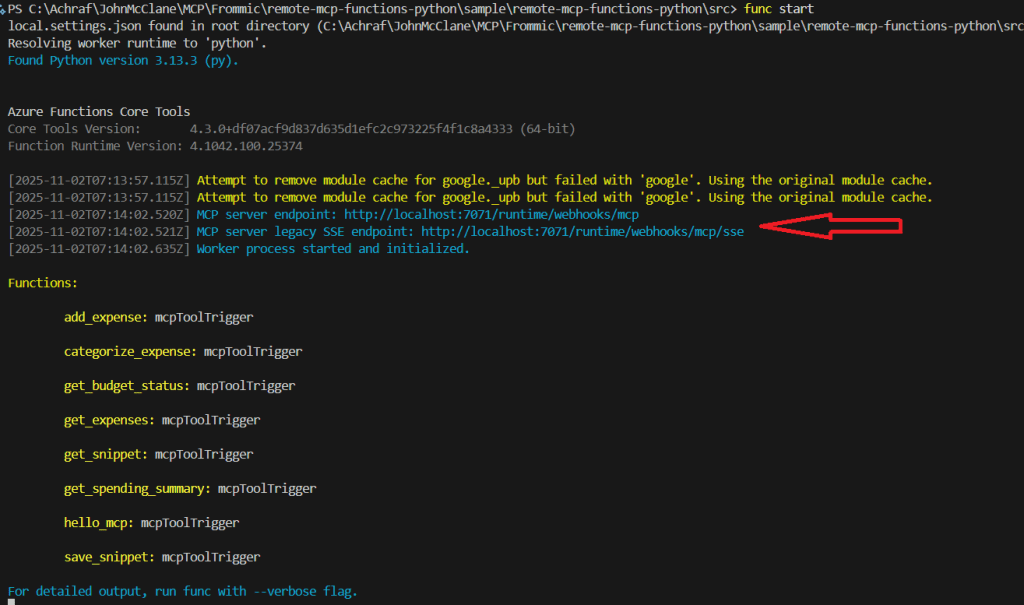
6️⃣ Testing our MCP server
First lets run the MCP server in VS Code :
cd src
pip install -r requirements.txt
func start
you make sure you already have the mcp inspector runing and also the Azurite emulator for local Azure Storage development and now open the mcp inspector page and paste that url on the url tab :
Testing the online server :
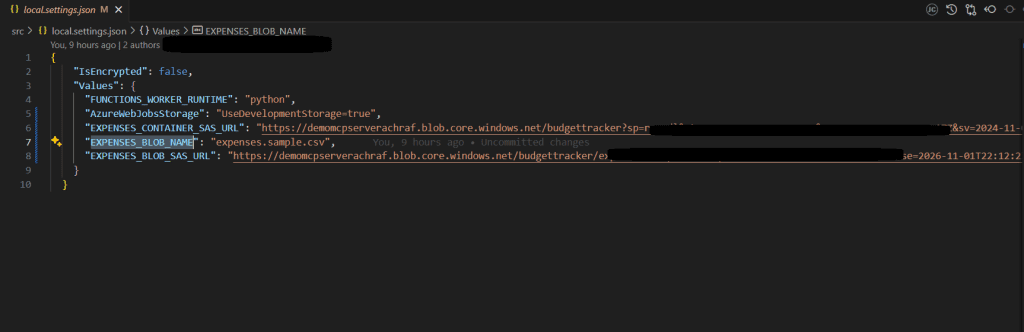
Now that we’ve tested the local server and added our MCP server to the mcp.json file, there’s one final step before we test it. We need to add the environment variables — using the values we copied earlier — to the local.settings.json file
{
    "IsEncrypted": false,
    "Values": {
      "FUNCTIONS_WORKER_RUNTIME": "python",
      "AzureWebJobsStorage": "UseDevelopmentStorage=true",
      "EXPENSES_CONTAINER_SAS_URL": "EXPENSES_CONTAINER_SAS_URL",
      "EXPENSES_BLOB_NAME": "expenses.sample.csv",
      "EXPENSES_BLOB_SAS_URL": "EXPENSES_BLOB_SAS_URL"
    }
  }
To test the setup, copy the Azure Function URL and append /runtime/webhooks/mcp/sse to it.
Then, go to Authentication, select the app key, and use it to authenticate the request.
Make sure to set the header name to x-functions-key.

Testing our MCP server with GitHub Copilot
Testing an MCP server with GitHub Copilot means configuring the server in your development environment so Copilot Chat can leverage it for richer context and enhanced capabilities.
we have already added the configuration in the mcp.json we should see the server running by now and we have Agent mode selected .
Lets try another tool , lets add some expenses :
Testing our MCP server with Claude Desktop :
first we need to edit the claude_desktop_config.json under the C:\Users\<username>\AppData\Roaming\Claude

We need to add to the file the config below
{
  "mcpServers": {
    "my‑mcp": {
      "command": "npx",
      "args": [
        "mcp-remote",
        "http://localhost:7071/runtime/webhooks/mcp/sse"
      ]
    }
  }
}
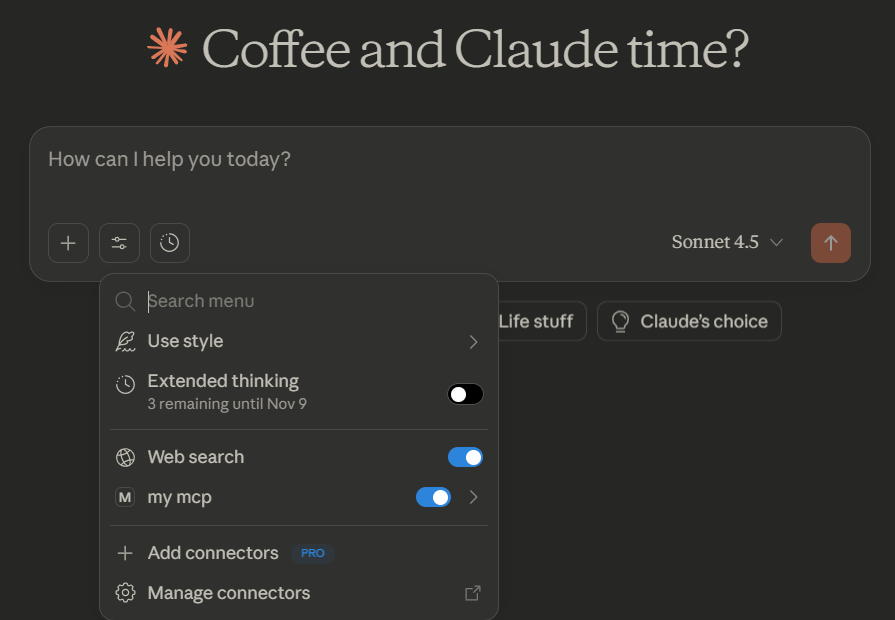
we can see our local server up and running ,its time to test
Conclusion
In this guide, we walked through how to create an MCP server using Azure Functions and Python, and tested it with tools like MCP Inspector, VS Code, and Claude Desktop. By following these steps, you now have a fully functional server environment ready for further experimentation and development.
In our next blog post, we’ll explore how to achieve the same setup using C#, giving you an alternative approach and expanding your toolkit for building MCP servers in Azure. Stay tuned!